 By Sebi Makis
Stepping off a plane into a breathtaking paradise brings an immediate urge to freeze time. Whether it is a sun-drenched tropical beach, a misty mountain village, or a bustling ancient marketplace, you want your photographs to mirror the exact magic you feel in that moment. Too often, however, stunning real-world vistas translate into flat, uninspiring phone screens or memory cards full of cluttered snapshots.
Transforming your travel images from basic snapshots into postcard-worthy art does not require thousands of dollars in high-end gear. It requires a shift in how you see the world through your lens. By understanding the fundamentals of light, composition, and human connection, you can capture the true essence of your wanderlust.
Here are ten essential travel photography tips designed to help beginners elevate their imagery and bring the magic of paradise back home.
1. Master the Golden Hour and Blue Hour
Light is the single most critical element in photography. The harsh midday sun creates dark shadows, squinting eyes, and washed-out colors. To capture paradise in its best light, you must adjust your sleep schedule to match the sun.
The Golden Hour
This occurs twice a day: during the first hour after sunrise and the last hour before sunset. The sun is low on the horizon, casting a soft, warm, golden glow across the landscape. Shadows are long and dramatic, adding depth and texture to buildings, mountains, and sand dunes.
The Blue Hour
Do not pack your camera away as soon as the sun dips below the horizon. The blue hour occurs roughly twenty to thirty minutes after sunset. The sky takes on a deep, rich indigo hue, while ambient city lights or beach bonfires begin to glow. This creates a peaceful, mysterious atmosphere that looks highly professional.
2. Embrace the Rule of Thirds
When beginners take a photo, their natural instinct is to place the subject dead center. While symmetry has its place, centering every shot can make your travel gallery feel repetitive and static.
The rule of thirds is a foundational composition technique that instantly adds balance and energy to your images. Imagine your frame divided into a grid of nine equal rectangles by two horizontal lines and two vertical lines.
-
Place Key Elements on Intersections: Position your main subject, such as a lone palm tree, a distant sailboat, or a local traveler, at the points where these lines intersect.
-
Align the Horizon: If you are shooting a beautiful ocean landscape, place the horizon along the bottom third line to emphasize a dramatic sky, or along the top third line to highlight the crystal-clear water.
Most smartphones and digital cameras have a built-in grid setting. Turn it on and use it until framing this way becomes second nature.
3. Find a Compelling Foreground Subject
A common mistake in landscape photography is capturing a vast, beautiful view that ultimately feels flat and distant. When you look at a stunning mountain range or a sweeping ocean view, your eyes naturally perceive depth. A two-dimensional photograph struggles to replicate this unless you give the viewer a visual stepping stone.
Always look for an interesting element in the immediate foreground to anchor your image. This could be:
-
A cluster of unique volcanic rocks on the shoreline.
-
Wildflowers blooming on the edge of a cliff.
-
A colorful canoe resting on the sand.
By including a foreground element, you guide the viewer’s eye into the frame, creating a powerful sense of scale and three-dimensional depth.
4. Tell a Story Through Local Details
While grand landscapes are breathtaking, a true postcard from paradise captures the texture and soul of a destination. Look beyond the panoramic views and focus on the smaller details that make a place unique.
Get closer and look for patterns, colors, and textures that tell a micro-story of your journey. Photograph the intricate tiles of a Moroccan riad, the vibrant spices piled high in an Indian market, the weathered hands of a fisherman mending his nets, or local street food sizzling on an open grill. These intimate, detailed shots add variety to your travel portfolio and evoke strong sensory memories when you look back at them.
5. Use Leading Lines to Guide the Eye
When someone looks at your photograph, you want to control where their eyes travel. Leading lines are natural or man-made lines within an environment that draw the viewer’s gaze through the image toward your main subject.
Paradise locations are full of geometric and natural lines if you train yourself to look for them. Excellent examples of leading lines include:
-
A long wooden pier stretching out into a turquoise ocean.
-
A winding jungle path disappearing into dense greenery.
-
A row of colorful architecture lining a European alleyway.
-
The curved shoreline where the waves meet the sand.
Position yourself so these lines start from the bottom corners or edges of your frame and point directly toward your intended focal point.
6. Capture Scale with Human Elements
Nature can be overwhelmingly grand, but without a point of reference, the true magnitude of a place can get lost in translation. A massive waterfall or a towering canyon wall might look like a small hill if there is nothing to compare it to.
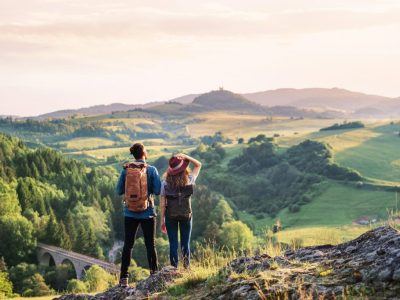
Placing a human figure into a vast landscape instantly provides a sense of scale. It allows the viewer to imagine themselves standing in that exact spot, experiencing the grandeur of nature. For the best results, have your subject wear bright, contrasting clothing, such as a yellow raincoat against a moody green forest or a red dress against a white desert dune. This ensures they stand out clearly against the massive backdrop.
7. Change Your Perspective and Angles
Most travelers take photos from eye level while standing straight up. Because everyone sees the world from this height, these images can quickly feel ordinary. To make your postcards stand out, change your physical relationship to the subject.
-
Get Low: Crouch down or lie on the ground. Shooting upward makes subjects look grander, more dominant, and more heroic. It also allows you to capture interesting ground reflections or textures.
-
Get High: Look for vantage points like rooftops, balconies, or hilltops. Shooting downward offers a bird’s-eye view that reveals hidden patterns in streets, beaches, or crowds that are invisible from the ground.
8. Respect and Connect with the Locals
Portraits of local people can be the most moving and memorable images of any trip. However, taking photos of people requires sensitivity, respect, and ethical awareness.
Never use a long zoom lens to secretly snap pictures of people from afar. Instead, approach them, smile, and strike up a conversation. If there is a language barrier, gesture toward your camera with a questioning look.
If they agree, take your time to capture a genuine smile or a moment of reflection. Always show them the final image on your camera screen afterward. If they decline, respect their privacy, smile, thank them, and walk away. Building a brief human connection always results in a far better portrait than a rushed, invasive snapshot.
9. Look for Natural Frames
Framing is a clever composition technique where you use elements within the environment to create a frame around your main subject. This technique draws immediate focus to your subject while adding layer upon layer of visual interest to the image.
When exploring a new destination, look around for objects that can act as a natural border. You can shoot through:
-
An arched stone doorway or a rustic window pane.
-
The hanging leaves and branches of a palm tree.
-
The mouth of a sea cave looking out toward the ocean.
This technique isolates your subject from distractions and gives the viewer the feeling that they are peeking into a secret, magical world.
10. Understand the Power of Post-Processing
A great photograph is rarely finished the moment you click the shutter. Professional travel photographers rely heavily on post-processing to bring out the true colors and emotions of a scene.
You do not need complicated, expensive software to edit your images. Free or affordable mobile applications like Lightroom Mobile or Snapseed offer powerful tools for beginners. When editing your travel photos, focus on subtle enhancements rather than heavy adjustments:
-
Clean up the horizon line using the crop and straighten tools.
-
Gently lift the shadows to reveal details hidden in dark areas.
-
Slightly increase the saturation or vibrance to match the vivid colors you remember seeing in person.
-
Adjust the white balance to ensure the warm glow of the sun looks natural.
The goal of editing is to enhance reality, not to create a fake landscape. Keep your adjustments minimal and elegant.
Frequently Asked Questions
What is the best camera gear for a beginner traveling to a tropical destination?
For beginners, the best camera is often the one you already have, including modern smartphones which possess excellent sensor capabilities. If you want to upgrade to a dedicated camera, a lightweight mirrorless camera paired with a versatile zoom lens (like a 24-70mm equivalent) is ideal. This setup gives you high image quality without weighing you down during long days of exploring.
How do I protect my photography equipment from sand, saltwater, and humidity?
Sand and salt water can ruin electronics quickly. Never change your camera lenses on a windy beach. Use a protective ultraviolet filter on the front of your lens to shield the glass from flying sand and salt spray. Keep your gear inside a sealed, padded camera bag when not in use, and carry a few silica gel packets inside the bag to absorb excess environmental moisture.
Should I shoot my travel photos in RAW or JPEG format?
If your camera or smartphone supports it, you should shoot in RAW format. JPEG files compress the image data, leaving you less flexibility during editing. RAW files capture all the data recorded by your camera sensor. This allows you to easily recover details in bright skies or dark shadows later during the editing process without losing image quality.
How do I avoid taking the exact same photos as every other tourist?
To avoid clichés, walk away from the main designated viewing platforms where everyone gathers. Walk around the perimeter of a famous landmark to find unique angles, look for reflections in puddles or windows, or focus entirely on the small details that others walk right past. Visiting popular locations at sunrise also guarantees fewer crowds and unique lighting conditions.
Is it necessary to use a tripod for travel photography?
A tripod is not strictly necessary for daytime shooting, but it becomes incredibly valuable for low-light situations, such as capturing the blue hour, star photography, or creating silky-smooth water effects on waterfalls. If you choose to travel with a tripod, look for a lightweight, carbon-fiber travel tripod that folds down small enough to fit inside your daypack.
How can I safely back up my photos while traveling abroad?
Losing your vacation memories due to a broken camera or a lost memory card is devastating. Get into the habit of backing up your images every single evening. You can transfer your files from your camera to your smartphone or tablet and upload them to a secure cloud storage service if you have reliable internet access. Alternatively, carry a portable external hard drive or multiple small memory cards, keeping them stored separately from your camera.